Joining Copper and Brass
(c) Antique Metalware Society
Small extracts can be used with acknowledgements to 'Oldcopper.org' website.
Helpful comments are very welcome.
Table of Contents
Manufacture of Hollowware
Joints for Hollowware
Dovetailed, Castellated or Cramped Joints
Lockseams
Brazing
Riveting
Welding
Spinning
Deep drawing
Manufacture of Hollowware
The way in which hollowware such as saucepans, kettles and dishes have been made is a good guide to quality, age and durability. Methods differ between craftsman coppersmith and quantity production and have changed through the years. Both can achieve fitness for purpose and both methods have always had to be made at a price to suit the market. The production techniques involved can include cutting, raising, seaming, deep drawing, spinning, brazing, welding and riveting. For cooking utensils, the insides are usually tinned after manufacture. Some recent production is of course intended only as interior decor rather than being for serious use.
Joints for Hollowware
Hollowware has to be produced as a three-dimensional vessel from flat sheet since neither casting nor hot forging are usually economic options. Methods have developed significantly through the centuries and these are generally obvious in the finished product. Initially, the basic need is to form the sidewalls and join them to a base. Spouts, handles and lids are fitted as needed. Traditional techniques involve cutting out copper sheet to form the sidewall, forming it to cylindrical shape and making a joint.
Dovetailed, Castellated or Cramped Joints
A brazed butt joint is not strong enough so an overlap must be used to give a bigger contact area for the join. A simple overlap is still not strong enough to take a battering in service, so the coppersmith’s technique is to make what appears to be a ‘cramped’, ‘dovetailed’ or ‘castellated’ joint. This involves forming a feathering by hammering the edges of the sheet to about half their original thickness and then cutting slits at right angles to the edge. These are bent out alternately and mated with the edge to be joined. The flaps are then hammered close to give a good friction fit that can be sealed by brazing or silver-soldering.
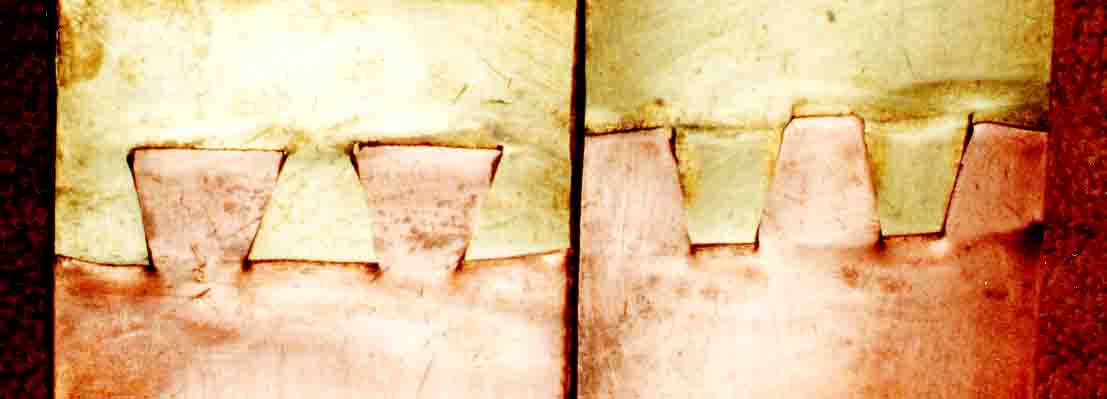
Note that the description ‘Dovetailing’ gives a joint of different type to that found with wood. The ‘dovetails’ are not keyed together right through the joint as for wood but overlapped and cramped as described. Coppersmiths much prefer to describe the joint as ‘cramped’.

Final finishing is by planishing the joint surface flat, so that it is the same thickness as the parent metal sheet. Normally, any handles or spouts are positioned to hide much of the sidewall joint.
As metalworking production techniques improved during the later 19th century it became possible to make tools to cut a regular castellated edge to copper sheets. This made joint making a much quicker and cheaper process. The serrations are usually closer spaced than hand cut joints.
To fit the base to the sidewalls with good quality smooth joints it is necessary to either bend up the circular base to fit the sidewall or bend the sidewall under to allow the base to be let in. The second technique keeps the brazed joint out of sight under the vessel. These methods were used commercially in Europe and America until around 1900. The technique can still be used and is still seen on some modern imported products, frequently not of such good quality.
Improved machines have made it possible to make deeper and deeper vessels out of one piece of flat sheet by deep drawing or spinning.
Lockseams
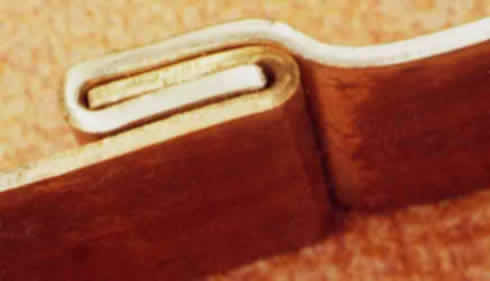
Another way of making joints is by using lockseams. This can be done by hand or machine and involves folding over a narrow strip of metal from each of the pieces to be joined, interlocking them, and soldering the joint to make it permanent and watertight.
 A water can made by Perry & Sons in the early 1900s that shows good quality lock seams. The handle has laps either side for strength and the ribs add decoration and rigidity.
Brazing
Using a filler of high-zinc brass it is easy to make brazed joints in copper items. Traditionally, this was the filler used to finish cramped joints before hard solder became available. It takes skill to make the joint neatly.
Hard solder is a copper-silver alloy that melts at a lower temperature than braze metal. It is used sparingly on joints made with fine clearances and leaves very tidy joints.
Riveting
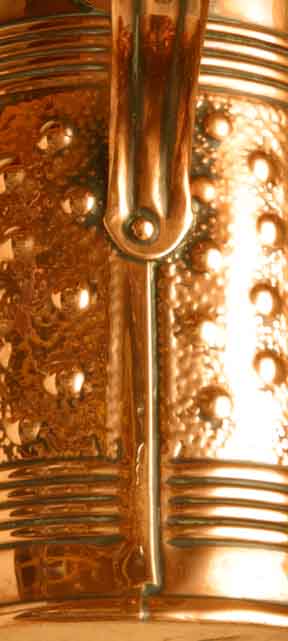
Traditionally, handles were fixed to the body of a vessel by riveting using copper rivets to give a good strong joint. Before rivets were available commercially they were made by the coppersmith from offcuts of copper folded and hammered to a round shape to fit the holes. Careful hammering ensured that a very neat joint was produced. Commercial rivets still need careful hammering to give a good round head with no splits.
Welding
Where joints may still be needed in the production of deep modern copper cookware, overlap and brazing has been replaced as a jointing technique by mechanised arc welded (MIG - metal-inert-gas) butt joints. Even after weld dressing, feint traces of the joints may be evident but do not affect the fitness for purpose of the products.
Arc Welding can now also be used for making butt joints in thinner metal for holloware such as jugs. Initially the development work was as an automated process to speed up the manufacture of domestic hot water cylinders. Having succeeded for light duty pressure vessels, the technique is now also used to help make holloware. Weld dressing is needed to give two good smooth sides to the joint.
Spinning
is a craft that developed when it became possible to keep a lathe revolving in one direction rather than use a bow string to drive it in alternate directions. A flat disc of metal is clamped against a shaped former held in the chuck. While this rotates, a wooden tool is held against it and pressure is applied to gradually form the disc to the shape needed. Bowls are easily made and vessels with parallel sides are possible within limits. Spinning marks are left by the tool, these being circumferential.
Deep Drawing
This method is now used to produce many straight sided vessels and gives no need to form and join a separate base. This process also starts with circles that are cut from sheet. They are held between two pressure rings while a shaped punch forces the metal through the centre of a die in one of them. As the drawing takes place, the sides of the vessel are formed by being drawn between the punch and die. Some items may be made in one operation. Taller items may need a second or third draw and possibly subsequent forming to make the designed shape. Longitudinal drawing marks may well be evident, though with good lubrication and unworn dies they should be minimal and easily polished out. Frequently traces can be still be seen. The original rolling marks may still be seen on the un-deformed base of the vessel.
After